The Infinity Mirror
Inspiration
I mostly wanted to build this because I felt like the Sigma Chi basement could use a facelift. It would also be incredibly fun to build a large light installation.
How does it work?

If you shine light between two mirrors, the light will forever be trapped inside of the two mirrors. If instead, you have a 95% mirror, then 5% of the light will exit and 95% of the light will return. That light continues to bounce around inside, always letting out 5% at each reflection. The diagram from the left was found from this instructable.
You can buy the rear mirror for very cheap on Home Depot or you can get an acrylic one at Altec Plastics . You'll be applying a film onto a clear acrylic piece for the front mirror, and again I'd recommend Altec Plastics (they have great discounts if you buy both). You then need to get some 95% film which you can find here . Then you simply apply the film onto the acrylic as the instructions say. You must spray water onto the acrylic before application of the film or else you're going to get bubbles you can't easily remove For the LEDs, you should get 5050 LED Strips (5060 if you're feeling adventurous) and some addressable WS 2812b LEDs. In case you were wondering, WS2812b use one 5050 LED while WS2811b use three small LEDs. One integrated 5050 LED is much more efficient.
Basic Planning: Design One
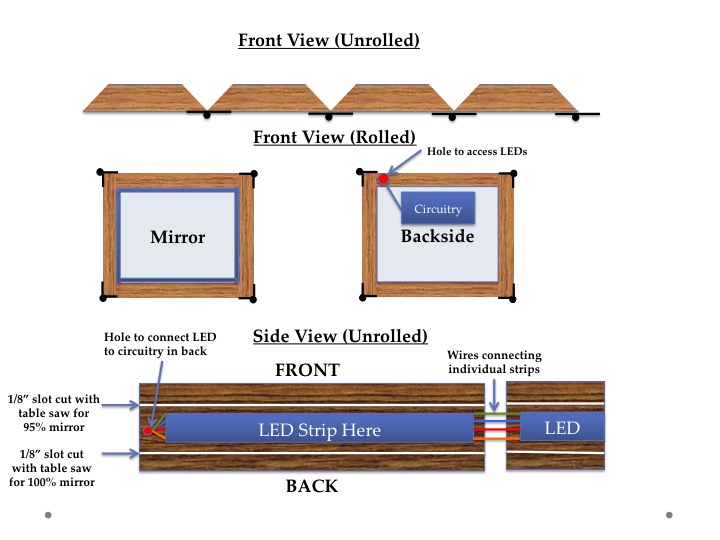
I started off thinking that I could use hinges as the structure of the large 3' x 4' frame at first. My intuition was that if I screwed the wood in with such large 2x4s, then the frame could break fairly easily. Using hinges would allow me to work on each piece separately, and then roll it all together. The problem became connecting the four pieces of wood electrically. This was just too much of a hassle, as the wire would often break when I wrapped the entire thing. Also, the extra wire upon closing the frame made the mirror look kinda gross.
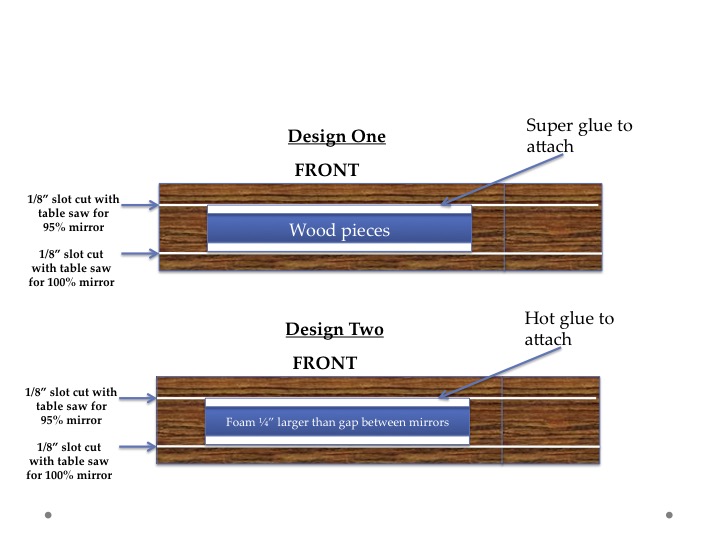 For the center, I figured I could just use a piece of wood and then hold it to the mirror using super glue. This was a horrible idea again, as the wood suspended on the mirror took a lot of
glue and just made the whole mirror very heavy. I ended up changing this design to design two as outlined in the figure to my right, but the first version of the mirror used wood.
You can see the first version of the mirror using this previous design below.
For the center, I figured I could just use a piece of wood and then hold it to the mirror using super glue. This was a horrible idea again, as the wood suspended on the mirror took a lot of
glue and just made the whole mirror very heavy. I ended up changing this design to design two as outlined in the figure to my right, but the first version of the mirror used wood.
You can see the first version of the mirror using this previous design below.
Basic Planning: Design Two
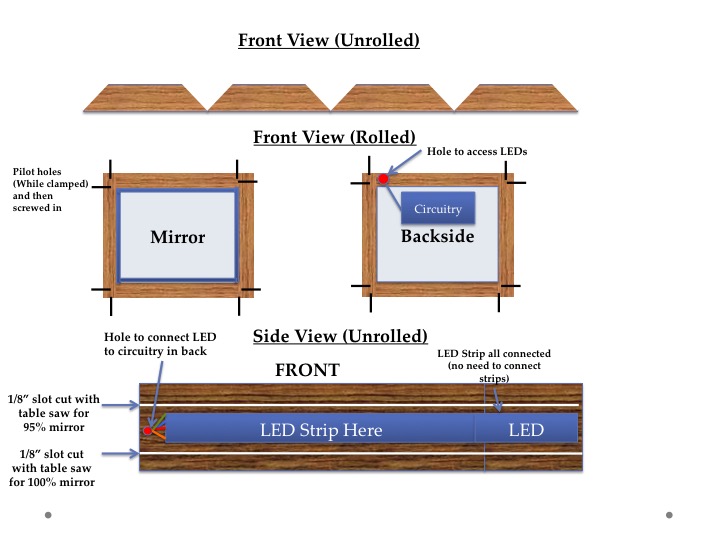 That ended up not working out because the wire connecting the LEDs were too fragile, and honestly, it was just too cumbersome. Enter David Campos, legend extraordinaire.
I asked David what I should do to make it more structurally sound, and he suggested the initial idea of drilling pilot holes into the sides of the frame and then holding it together
via screws. Then he suggested the idea of putting the infinity mirror on the ceiling and using foam instead of wood as the structure on the inside. Basically, he's way better
at this than I am. We edited the design and then made it work. I don't know what I was worrying about when it came to holding the frame together.
That ended up not working out because the wire connecting the LEDs were too fragile, and honestly, it was just too cumbersome. Enter David Campos, legend extraordinaire.
I asked David what I should do to make it more structurally sound, and he suggested the initial idea of drilling pilot holes into the sides of the frame and then holding it together
via screws. Then he suggested the idea of putting the infinity mirror on the ceiling and using foam instead of wood as the structure on the inside. Basically, he's way better
at this than I am. We edited the design and then made it work. I don't know what I was worrying about when it came to holding the frame together.
To place it on the ceiling, we simply used four large 1/2" diameter bolts, pilot holed them to the ceiling with three bros holding it in place, and then ratchet driving it in. Worked like a charm.
Circuitry
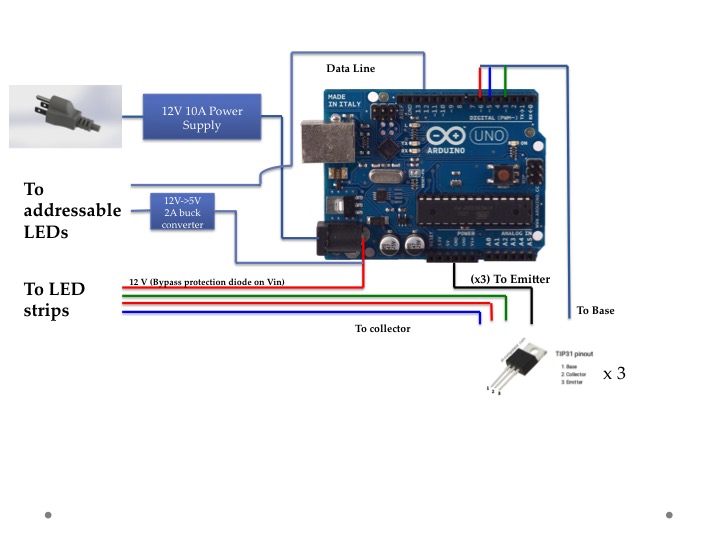
The circuitry itself was pretty easy and also went through two designs changes.
I originally bought a 12V->5V 2A buck converter, but that stopped working really quickly. I'm not sure if I broke the transformer or the LEDs,
but I had to go back in and change the circuitry after the buck converter broke. If I continued using the buck converter approach, I'd need a larger power supply, which wasn't in the budget.
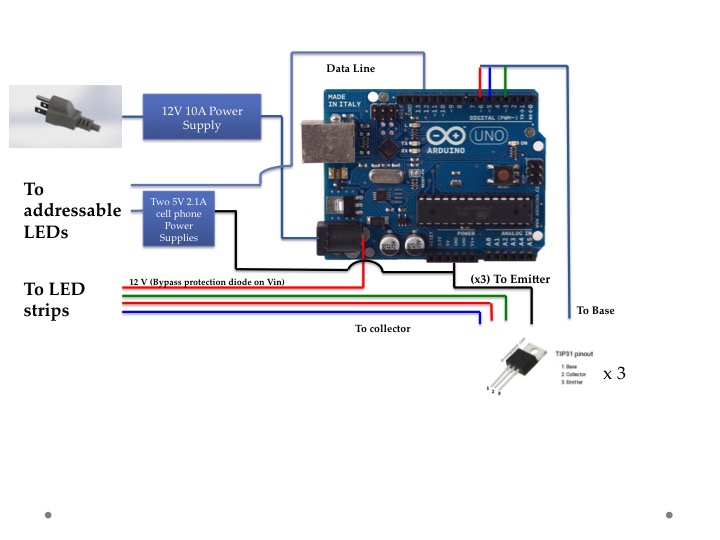 I instead used two 2.1A cell phone chargers as a power supply and connected them both directly to the 5V of the LEDs. Be sure to connect the cell phone charger's ground to the original power supply.
The circuitry all lives on the back of the mirror, so you can't see it when it's on the ceiling (which is good because the circuitry was UGGLY).
I instead used two 2.1A cell phone chargers as a power supply and connected them both directly to the 5V of the LEDs. Be sure to connect the cell phone charger's ground to the original power supply.
The circuitry all lives on the back of the mirror, so you can't see it when it's on the ceiling (which is good because the circuitry was UGGLY).